
For Ducati Monster Tail Lights
As many of you have probably noticed by driving around, many tractor trailors, mass transit vehicles, and luxury cars are now using LED's for turn signals, brake lights, and tail lights. I've been intrigued by the way the light from LED's seems clear and focused, as well as how visible it is from a longer distance. There are many advantages to using LED's for this application. If they are not overdriven (supplied with too much current for a gain in brightness) they can last thousands and thousands of hours of operation. LED's are solid state devices that convert electrical energy to light typically at 90% efficiency or better, compared to a light bulb that is typically 40-60% efficient. They give off very little heat, and the LED package is not nearly as sensative to vibration as a light bulb is. The time LED's take to reach full brightness is much less than with light bulbs. For braking, it can give you the advantage if up to 200ms, which effectively is increased stopping distance. Consider what this represents at different speeds. On the highway, it is significant! The goal here is to make the tail light that is more reliable, visible, and hopefully safer...
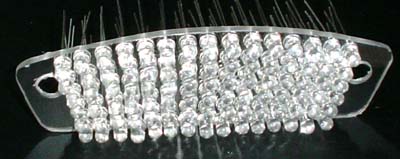
I made a basic prototype of the array with 24 LED's. At full brightness, the brake light was very visible, but the running light needed a little help. This version uses 45 5mm LED's. Step 1 was to measure the inside of the lense and develop an attractive placement pattern for the LED's. I decided to follow the contours of the tail lense, because the prototype was a rectangular pattern, which I didnt like the look of.
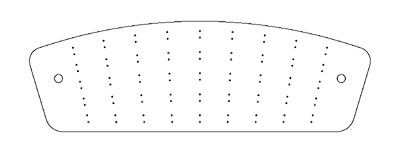
Here is my drill pattern in both AutoCAD and Adobe PDF:


LED's were glued to the Lexan holder and soldered up into a series-parallel combination.
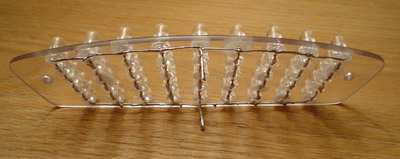
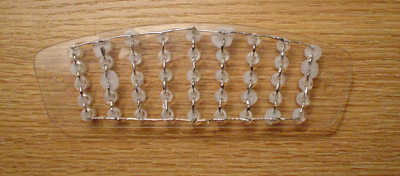

Resistor values of 150ohms and 16ohms were selected for the running and brake inputs.
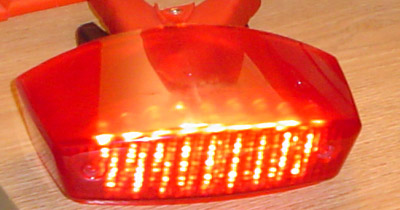
Looks interesting behind the stock lense. Originally I was considering a clear tail lense, but I like the stock look.

I sacraficed the stock bulb to create a harness that wouldn't require modifying any of the stock wiring.
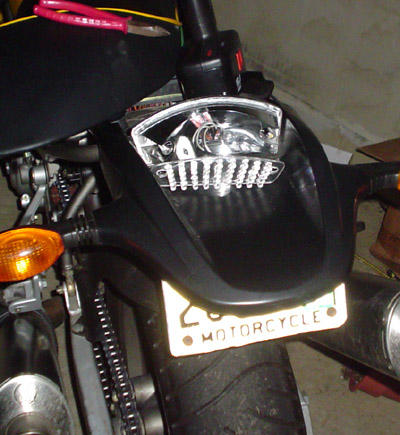
Ready for the lense cover....
Questions? Comments?
Please send email to feuss2 [at] sca40 [dot] com and have "LED Tail Light" in the subject line

Kohls Coupon
Update 27-DEC-04
Once in a while, you just have to take it that one step further. While 45LED's was nice, 90 is even better. This was a mid-contruction photo of the array currently in my bike:
It's known to those who ride behind me at night as "the red laser" as it is tempting, but rather unpleasant to stare straight into...
Updated 31-JAN-10
Still going strong! No issues.
To answer some FAQ's:
- The drill pattern for the 90-LED version is here. It is ONLY available in PDF. The CAD file is lost!
- The LED's were purchased from Digikey. I am not certain if they still have the same exact ones. They were red emitting 40 degree viewing angle, 5mm with a water clear lense. Their parametric search will guide you to those exact ones or simlar.
- PLEASE READ CAREFULLY ABOUT WHY I DID NOT USE WHITE LED'S: It's because they don't emit nearly as much red light as red LED's! White LED's contain a mix of several colors to appear white. In fact, the "cooler" the white, the less red content. Red light is needed for tail lights. Tail light lenses do not convert white light into red! Instead, they absorb light which is not red for the output to appear red. Red-emitting LED's behind a red filter will be nearly as intense as red LED's behind a clear lense! If you see people whose tail lights look light pink, they have made the mistake of putting white LED's behind a red filter!
- This page is showing a DIY coversion. It is not advertising any product that has ever been or will ever be for sale.
- If you are reading this page and have questions like "what are the resistors for?" or even want to try a different application and need to know what resistors go with what LED's, etc, please do some basic searches in Google like "LED resistor calculator" as the first page of results will lead to some excellent resources.
Some recommendations:
- Measure the supply voltage for your application! 12V is only the battery voltage. When the engine is running, the electrical system is likely to run at 13.8-14V to charge the battery.
- LED's have fantastic life expectancies, this is based on not being overdriven. If you have a 20mA LED that is rated for 30mA max, do not run it at 30mA constantly. Perhaps in a dual brightness configuration, hit 25mA if it will be for SHORT periods of time.
- Don't feel like resistors are the ONLY way to control brightness! The first tail light I retrofitted was in 2002. The 90-led version built in 04 is the same designed just with more LED's. There are now many LED drivers available and products that are pre-wired, etc. Check out superbrightleds.com for example...
|